This step-by-step guide tutorial shows you how to change time format in windows 11 with the easiest way.
Friends, you know that Windows 11 has come up with new interfaces and various new features. Such as Redesign Start Menu, Android App Support, Performance Improvement Features, and many more. Many window enthusiasts enjoy it.
However, this new interface causes a lot of confusion. Many people ask how to change the 24-hour format in windows 11. Because the time and date are frequently shown incorrect, it selects a different region or displays the date and time in 24-hour format.
If you are one of them then you have come to the right place. Because through this article I will show you to change the time format in windows 11.
How to change time format in windows 11 from 24 to 12


- Right-click Time and Date on the right side of the taskbar
- Click on Adjust Date and Time
- Then scroll down and click on Language and Regions below Related Links.
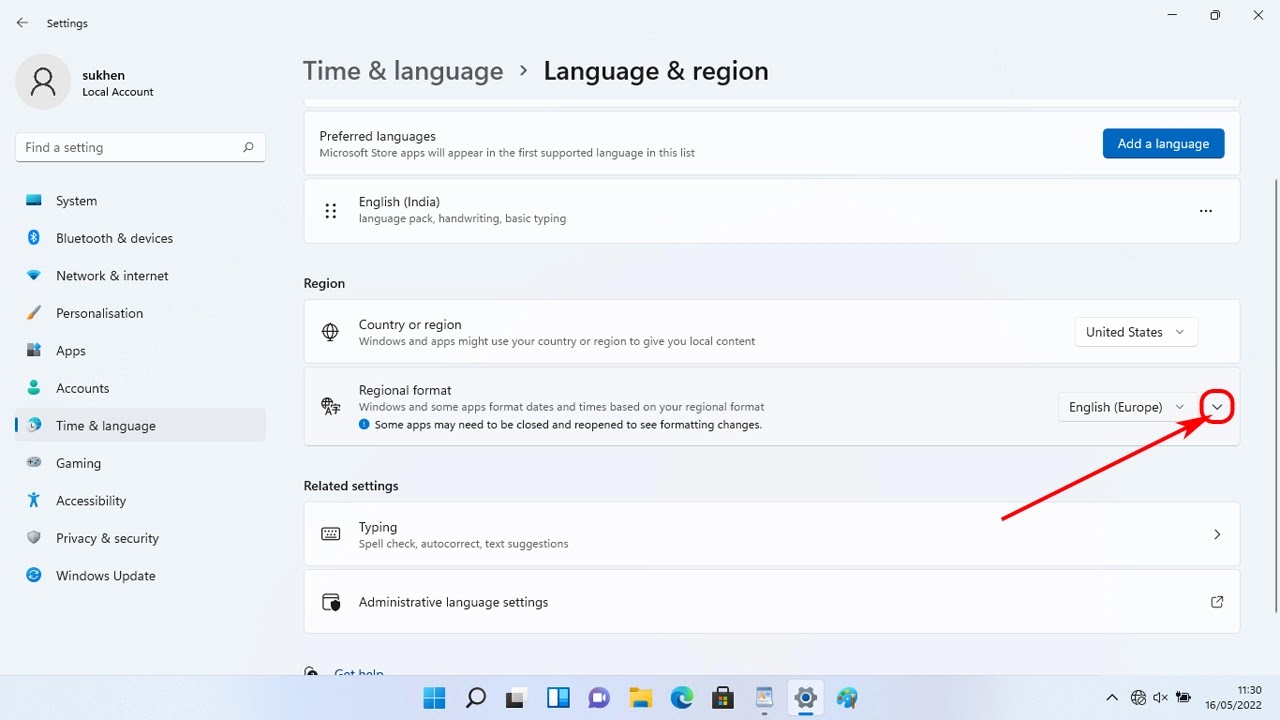
- Then click on the drop-down arrow on the far right of the regional format.
- A drop-down menu will open. You need to click on Change Format.
- Then at the bottom, you will see an option Short Time. Click on the drop-down arrow there and select 9:40 AM.
Then you will see that your time format has changed from 24-hour format to 12-hour format.
Also Read: How to install windows 11 on an unsupported pc
By changing the regional settings
In different regions time format is different. During the windows 11 installation process, you keep the region in default. But actually, your region is another. So in that case there may cause showing different time format.
So by changing the region your problem may solve. Check the below methods:
Step 1: First, open settings (windows + I).
Step 4: Now in the regional format choose your region by clicking on the drop-down arrow.
Time format will change either you need to close some apps to take the effect.
How to change time format in windows 11 by control panel
You can also set the time format through the control panel. This method is also available on old windows versions like windows 10, 8.1, and windows 7. Here’s how:
Step 1: Click on the search icon and type the control panel.
Step 2: Open the control panel.
Step 5: A pop-up appears. Choose your region. Then in the short time choose hh:mm tt for twelve hours format. Either choose HH:mm for 24 hours format.
Step 6: Now click on apply and then ok.
Final word
So friends by these simple steps you can easily change the time format in windows 11. If you are stuck on any steps then don’t forget to comment below.
I will try to solve your problem. Also if you enjoy this article then you must share it with your friends and on social media. Also, check our windows guide section for more free guides like this.


