In today’s step-by-step guide tutorial you will learn how to install windows 11 on unsupported pc.
I was very interested when I heard about the release of Windows 11. I planned to install Windows 11 as soon as it was available. But later I know that there are two conditions for installing Windows 11 that my PC does not meet. I was worried!
But finally, I was able to install Windows 11 on my unsupported computer. So I thought I’d share with you how I succeeded in installing Windows 11 on my PC.
To install Windows 11 on an unsupported computer, you need to bypass two things: Secure Boot and TPM 2.0. And in this article, I will show you four ways to do it.
What needs your attention before installing windows 11 on unsupported pc?
Before installing Windows 11 on an unsupported computer, there are a few things to keep in mind:
- Windows 11 can cause compatibility issues with your device.
- No new updates and support from Microsoft.
- Depending on your computer’s configuration, some features may not work properly or Windows may be corrupt.
So friends, before you install Windows 11 on that unsupported PC, you must remember all these aspects. And you install windows 11 at your own risk.
Because no one will be responsible for the damage to your data. If I talk about my personal experience then my computer is working without any problem for a few weeks.
Re-check if TPM 2.0 and secure boot are disabled in the BIOS
TPM 2.0 and Secure Boot are generally disabled by default on our computers. So, first of all, check to see if your computer has TPM 2.0 and the secure boot option. If you’re not sure how to perform that, check out this guide on how to enable secure boot and TPM 2.0 and BIOS?
But after checking this, if you are sure that none of them are on your system, you can follow the below instructions to install Windows 11 on an unsupported computer.
How to download Windows 11 ISO file?
To install Windows 11 on an unsupported computer, you need to download the Windows 11 ISO file. And will require a USB pen drive with a minimum size of 8 GB. Follow the below-given method to download Windows 11 ISO file from Microsoft’s official website:
- First, open your internet browser.
- Then visit Microsoft’s official website.
- Here you will see three options. After scrolling down, you will see an option Download Windows 11 Disk Image (ISO). Click on the drop-down arrow and select windows 11. Then click on download.
- In the next step, you need to choose the language and then click on confirm.
- After that click on the 64-bit download button. And windows 11 ISO will start downloading automatically. The size of windows 11 is around 5.2 GB.
First method: how to install windows 11 on unsupported pc using USB?
This is the easiest way to install windows 11 on unsupported pc by Rufus. Using the popular media creation tool Rufas portable, you can easily bypass the checking of TPM and Secure Boot. Learn how to use:
- First, plug a USB drive with a minimum capacity of 8GB into your computer.
- Then run the Rufus Portable app.
- Your USB drive will be automatically selected in the Device section. Check the drive letter to confirm.
- In the boot selection section, click on the select option. Then find and open the ISO of Windows 11 that you have downloaded.
- A new section called the image option will appear. In this section select the Extended Windows 11 installation (no TPM/no Secure boot).
- Then select GPT or MBR in the partition scheme section. Which depends on the partition scheme of your computer’s hard disk.
- Then give a name in the Volume Label section if you want and then click the Start button.
- It will take some time to turn your USB drive into bootable.
Once this bootable USB is created you can use this USB drive to clean install windows 11 on your unsupported pc. Check method two if you want to use another technique.
Second method: How to install windows 11 on windows 10?
Guys, you can use the second method for upgrading from windows 10 to windows 11 on an unsupported computer. You can not use this technique for a clean installation.
To do that you need the windows 11 iso file that you already downloaded and I discuss it already. Now check what to do:
- First, extract the windows 11 iso file.
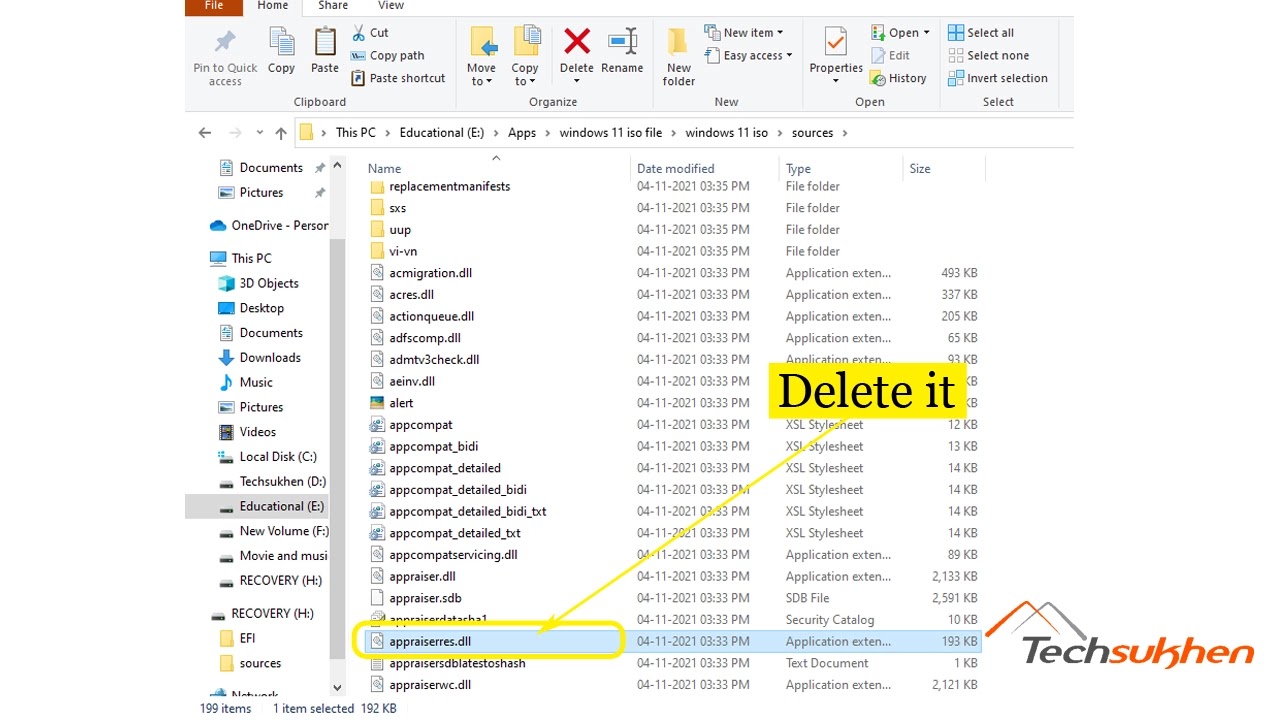
- Then go to the sources folder.
- Now find and delete the appraiserres.dll and confirm that you are deleting the right file.
- Again back in the iso folder. And run the setup.exe file.
- It will load for a while then click on the Next button.
- Wait until it checks all requirements. Then you will enter in the terms and conditions page. Click on the accept to continue the process.
- Again it will load for a while. Then you will find an option what to keep. Choose what you won’t keep, your files or not. After choosing click on the Next button.
- Now finally click on the install button and windows 11 will start installing on your windows 10 computer. Follow the upcoming steps during the installation process to complete the installation.
Third method: Install windows 11 on unsupported hardware Regedit
In this method, we use Regedit to clean install windows 11 on your unsupported pc. To do that you need to follow some simple steps. Here’s how:
Step 1: First, create a bootable windows 11 pendrive. You can follow this guide on how to create a bootable USB drive.
Step 2: After that open Notepad and paste the below codes:
Step 3: Save the notepad file as bypass.reg on another drive and remind the path.
Step 4: Once you completed all these steps plug the bootable pendrive and restart your system.
Step 5: Now use the boot menu key to enter in the boot menu. You can search on google to know your computer boot menu key.
Step 6: Then you need to select the bootable drive. Your windows 11 installation process going to start.
Step 7: Choose the language and click on next.
Step 8: Then click on install now.
Step 9: In the next window, you need to enter the product key if you have one. Either choose I don’t have the product key.
Step 10: Choose which windows 11 version you want to install and then click on Next.
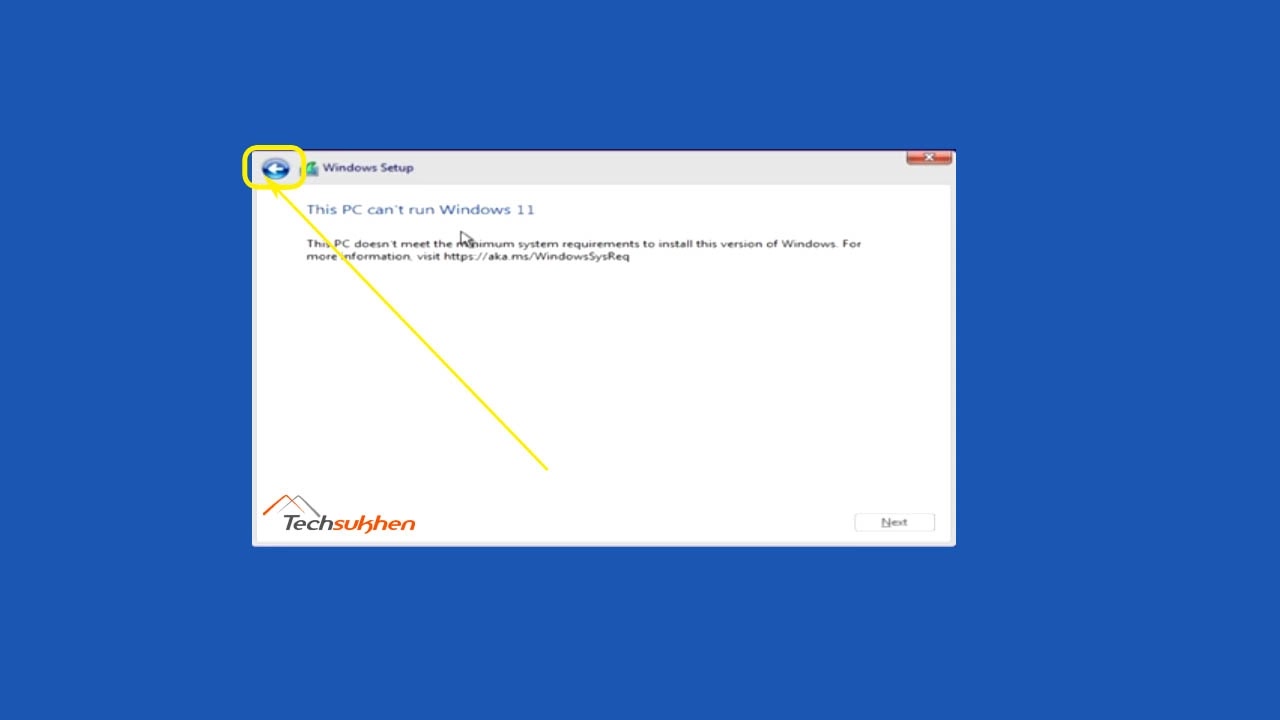
Step 11: You will find an error that This PC can’t run windows 11. Don’t worry! Click on the back arrow at the top left corner in the setup window.
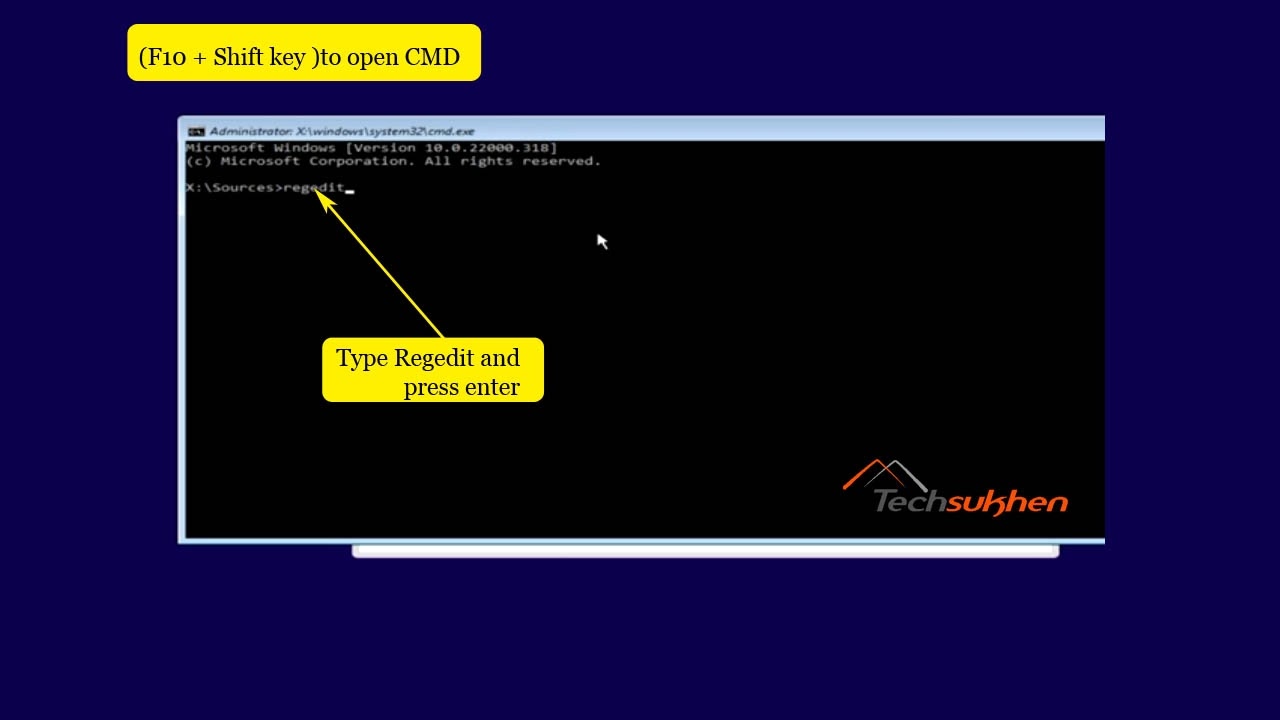
Step 12: Press Shift + F10 from your keyboard.
Step 13: A command prompt window will appear. Type Regedit and press enter.
Step 14: The registry editor will open. Choose File > import.
Step 15: Now choose the bypass.reg file location that you save on another drive. Then click on open and ok.
Step 16: Now close the registry editor and exit the command prompt.
Step 17: Again you can choose the windows 11 version and click on next.
Step 18: Then you will enter the terms and conditions page. Accept it and click on next.
Step 19: Choose the drive where you want to install windows 11. Format it and then click on next.
Step 20: And finally, windows 11 will start installing. Just wait and follow the upcoming steps to complete the installation.
Fourth method: Bonus tips
You can use all the above processes to clean install or for the upgrade. But still, I will share with you a bonus tip. In this method, you need a bootable windows 10 drive and a windows 11 iso file.
When you start installing with this method you will see that windows 10 is installed. But ultimately windows 11 will be installed on your device. Now follow the steps:
- Plug the windows 10 bootable USB drive.
- Open or extract the windows 11 iso file.
- Then go to the sources folder. Now find and copy the install.esd file. The size of this file is approximately 3.5 GB.
- Now open the windows 10 USB drive and go to the sources folder and paste it.
- You need to choose to Replace the file in the destination.
- Once the copying process is completed restart your PC and enter in the boot menu by pressing the boot menu key.
- Now follow the installation steps to complete the installation.
Final word
Friends I share four methods on how to install windows 11 on unsupported pc. I think the first method is the easiest way for you. But if you face any problem with that method then you can try another one.
And you must share which method you use to install windows 11 on your unsupported computer. Also if you found any other issue or faced any problem then comment below. I will try to solve your problem.


